clDNN Introduction

0x1 总体结构

clDNN(Compute Library for Deep Neural Networks)是采用OpenCL来加速DNN(Deep Neural Networks)的framework。目标平台是Intel® HD and Iris™ Pro Graphics。clDNN目前已经是Intel OpenVINO的一部分。OpenVINO还包括了其它各种硬件平台的加速库,如CPU上的加速库mklDNN等。clDNN当然也可以改造成在NVIDIA和AMD的GPU上运行,虽然这个时候的性能可能需要进一步tuning。

clDNN对DNN中有关概念进行了抽象,其中有关数据类型的层次结构如下。
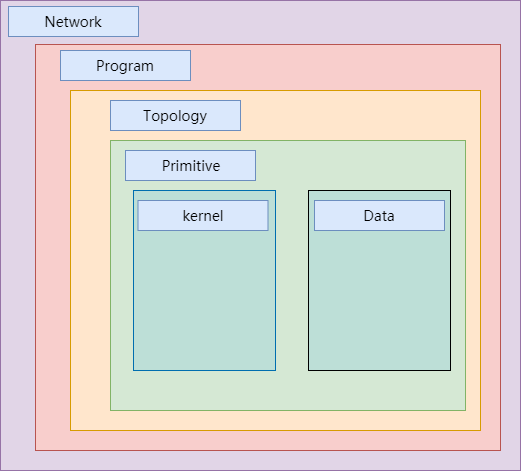
这些数据类型的定义简单说明如下。

Kernel - 算子计算的OpenCL实现。
Primitive - DNN中基本运算单元,如convolution, pooling, softmax等,也就是通常所说的算子。
Data - 特殊的算子,用来表示运算过程中的参数,如weights和biases, 也指DNN的输入和输出。
Engine - DNN中运行的加速器的类型,目前只有OpenCL engine一种。
Topology - 指DNN中的graph,其中包括了primitives, data和他们之间的关系。
Program - 位于Topology和Network之间(可选项),是编译好的graph网络但是没有分配内存。
Network - 编译好的graph网络并且已经分配内存,可以运行,在编译网络的过程中,网络参数可以进行特殊的优化如fusing,data reordering等。

clDNN的执行流程图如下所示。

执行过程包括下面的步骤
a.Create Engine.
b.Declare or define primitives parameters (weights and biases) if needed.
c.Create primitives. It is required to provide name for each primitive.
d.Create topology
e.Add primitives to topology
f.Build Network from topology
h.Set Inputs data
g.Execute Network

本文后续对这些过程进行详细的说明。

0x2 LoadNetwork流程分析


LoadNetwork的执行流程如上图所示,下面详细来介绍一下其中涉及到的内容。

0x21 kernel selector

前面已经知道,clDNN是通过OpenCL来加速DNN的推理执行,就是说其中的算子是通过OpenCL来加速的,kernel就是指采用OpenCL内核实现的算子。
kernel selector提供了如何选择最适合的kernel的接口,Primitive创建kernel的时候,调用kernel selector来得到最合适的kernel。

上层不能直接操作OpenCL kernel,所以提供了对应的wrapper,这些wrapper都在下面这个目录中。
inference-engine\thirdparty\clDNN\kernel_selector\core\actual_kernels
另外wrapper还定义了kernel支持的输入和输出数据格式。

对应的OpenCL kernel的定义都在这个目录下面。
inference-engine\thirdparty\clDNN\kernel_selector\core\cl_kernels

现在我们想知道OpenCL kernel是什么时候创建的呢?通过分析代码,我们可以知道OpenCL kernel的创建是在build_program的时候通过下面的循环来实现的。

1
2
3
4
5
6
7
8
9
10
void compile_graph::run(program_impl& p) {
for (auto& node : p.get_processing_order()) {
if (!node->is_type<internal_primitive>() && !node->is_type<data>()) {
node->get_output_layout();
if (!node->is_type<data>() && !(node->is_type<mutable_data>() && node->get_dependencies().empty())) {
node->selected_impl = node->type()->choose_impl(p.get_engine(), *node);
}
}
}
}

上述代码中selected_impl的定义为primitive_impl类型的std::shared_ptr变量。
上述函数会调用到下面的create()函数。
这个函数再通过调用kernel_selector.GetBestKernels来创建最合适的OpenCL kernel。

1
2
3
4
5
6
7
8
9
10
11
static primitive_impl* create(const scale_node& arg) {
......
ew_params.layoutBased = true;
auto& kernel_selector = kernel_selector::eltwise_kernel_selector::Instance();
auto best_kernels = kernel_selector.GetBestKernels(ew_params, ew_optional_params);
auto scale = new scale_gpu(arg, best_kernels[0]);
return scale;
}

0x22 primitive封装

primitive是对前面通过kernel selector取得的kernel的封装。
其中的primitive结构体都是通过typed_primitive_gpu_impl来定义的。

clDNN Library提供了下面这些primitives

Convolution
Fully connected (inner product)
Pooling
    average
    maximum
Normalization
    across channel
    within channel
    batch
Activation
    logistic
    tanh
    rectified linear unit (ReLU)
    softplus (softReLU)
    abs
    square
    sqrt
    linear
Softmax
Crop
Deconvolution
Depth concatenation
Eltwise
ROI pooling
Simpler NMS
Prior box
Detection output

通过对上述primitive的封装,clDNN提供了下面的topologies
Alexnet
Googlenet(v1-v3)
ResNet
VGG
faster-rCNN and other.

0x23 OpenCL接口的封装

在目录inference-engine\thirdparty\clDNN\src\gpu\下面提供了OpenCL封装的代码,这些代码对OpenCL的底层api进行了封装,方便了clDNN其他模块的调用。

其中的gpu_queue类提供了对OpenCL command queue的封装,对外提供了command queue的创建和使用的接口。

1
2
3
4
5
6
7
8
9
10
11
12
13
class gpu_queue {
public:
......
private:
uint32_t id;
std::weak_ptr<gpu_toolkit> _context;
cl::CommandQueue _command_queue;
std::atomic<uint64_t> _queue_counter{0};
std::atomic<uint64_t> _last_barrier{0};
std::shared_ptr<events_pool> _events_pool;
cl::Event _last_barrier_ev;
bool _output_event = false;
};

gpu_toolkit类提供了OpenCL操作的统一接口,其他模块只需要调用gpu_toolkit就可以实现OpenCL的相关操作。

1
2
3
4
5
6
7
8
9
10
11
12
13
14
15
16
17
18
19
20
21
22
23
24
25
26
27
28
class gpu_toolkit : public std::enable_shared_from_this<gpu_toolkit> {
......
private:
configuration _configuration;
cl::Device _device;
cl::Context _context;
cl_platform_id _platform_id;
device_info_internal _device_info;
bool _neo_driver = false;
kernels_cache _kernels_cache;
std::map<uint32_t, gpu_queue> _command_queues_w;
std::shared_ptr<rapidjson::Document> _device_cache;
kernels_binaries_container _binaries;
bool _serialize = false;
std::string _extensions;
struct ocl_logger;
std::unique_ptr<ocl_logger> _logger;
// returns whether a barrier has been added
std::ofstream& open_log();
std::string get_device_version() { return _device.getInfo<CL_DEVICE_VERSION>(); }
// void build_command_queues();
gpu_queue& get_command_queue(uint32_t id);
};

0x24 graph optimizer

在build_program的时候会初始化graph,然后执行graph优化,包括pre_optimize_graph和post_optimize_graph。
执行步骤都是在下面的build_program函数中完成的。

1
2
3
4
5
6
7
8
9
10
11
12
13
void program_impl::build_program(bool is_internal) {
init_graph();
{ pre_optimize_graph(is_internal); }
run_graph_compilation();
{ post_optimize_graph(is_internal); }
prepare_memory_dependencies();
engine->compile_program(*this);
if (!is_internal)
prim_info = get_current_stage_info();
cleanup();
}

下面来分析一下pre_optimize_graph和post_optimize_graph分别是如何对graph进行优化的。
graph优化是通过调用apply_opt_pass来实现的。

1
apply_opt_pass<trim_to_outputs>();

apply_opt_pass是模板函数,模板参数trim_to_outputs是继承于base_pass的优化pass。

1
2
3
4
5
6
7
class trim_to_outputs : public base_pass {
public:
trim_to_outputs() : base_pass("trimmed") {}
private:
void run(program_impl& p) override;
};

模板函数apply_opt_pass的定义如下。在模板函数中生成Pass对象,Pass对象的基类是base_pass,然后调用pass_manager的run函数执行优化操作。

1
2
3
4
5
6
7
8
9
void apply_opt_pass(base_pass& pass) { pm->run(*this, pass); }
template <class Pass, typename... Args>
typename std::enable_if<std::is_base_of<base_pass, Pass>::value &&
std::is_constructible<Pass, Args...>::value>::type
apply_opt_pass(Args&&... args) {
auto pass = Pass(std::forward<Args>(args)...);
apply_opt_pass(pass);
}

pass_manager的run函数定义如下。在run函数里会调用优化pass的run函数来执行具体的优化操作。

1
2
3
4
5
6
void pass_manager::run(program_impl& p, base_pass& pass) {
......
pass.run(p);
......
pass_count++;
}

0x25 program node创建

program_node的定义如下,每一个program_node和一个primitive_impl相对应,primitive_impl是前面提到的OpenCL kernel函数的封装。

1
2
3
4
5
6
7
8
9
10
11
12
13
14
15
16
17
/*
Base class for all primitives which wraps API class and extends it to be used
in graph context.
*/
struct program_node {
......
protected:
std::shared_ptr<primitive> desc;
program_impl& myprog;
std::shared_ptr<primitive_impl> selected_impl;
bool valid_output_layout = false;
layout output_layout = layout(data_types::f32, format::bfyx, tensor());
std::vector<program_node*> dependencies;
std::list<program_node*> users;

program_node的创建函数如下,创建好的node保存在nodes_map中。

1
2
3
4
5
6
7
8
9
10
11
12
13
14
15
16
17
18
// create all nodes from topology primitives, add dependencies among them and create inputs list
void program_impl::prepare_nodes(topology_impl const& topology) {
auto const& topo_map = topology.get_primitives();
for (const auto& prim : topo_map) {
get_or_create(prim.second);
}
......
}
program_node& program_impl::get_or_create(std::shared_ptr<primitive> prim) {
auto itr = nodes_map.lower_bound(prim->id);
if (itr != nodes_map.end() && itr->first == prim->id)
return *itr->second;
auto new_node = prim->type->create_node(*this, prim);
nodes_map.insert(itr, {prim->id, new_node});
return *new_node;
}

typed_program_node是program_node的继承类,提供了对各种类型的program_node的封装。

1
2
3
4
5
6
7
8
template <>
struct typed_program_node<activation> : public typed_program_node_base<activation> {
using parent = typed_program_node_base<activation>;
typed_program_node(const std::shared_ptr<activation> prim, program_impl& prog) : parent(prim, prog) {
support_padding_all(true);
}
......
};

0x3 Infer流程分析

前面网络加载好了以后,下面就开始真正的推理执行了,详细的流程如下。

这个时候为了加速推理执行,如上图所示,采用了多线程的方法来提高执行的并行度,主线程把不同stage的task分配到不同的线程中去执行。
每个kernel执行的时候会调用enqueueNDRangeKernel来issue OpenCL驱动来执行计算。

我们知道一个推理网络执行的时候会有很多算子在执行,这些算子的执行在GPU上,如果每个算子执行完成以后都需要把结果从GPU读取到CPU中的话,效率会很低,这种执行模型如下所示,我们称之为sync执行模式。
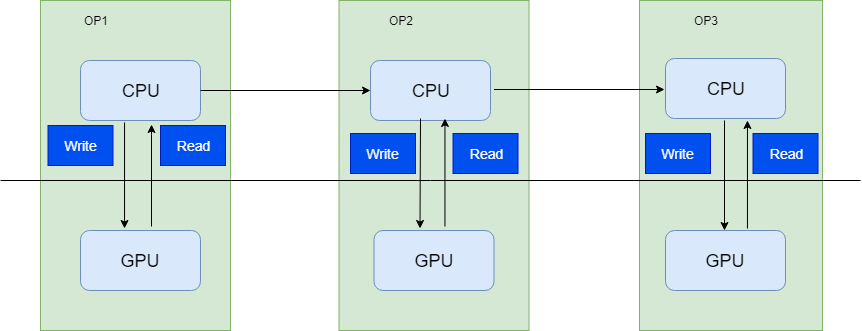
clDNN中采用的是如下图所示的async执行模型,各个算子之间的同步通过event来控制,每次算子执行完成以后,不需要把数据从GPU读取到CPU中。整个流程中只需要一次GPU buffer写入操作和一次GPU buffer读取操作。

下面是clDNN中enqueue kernel的代码。从代码中我们可以看到算子在每次执行enqueueNDRangeKernel的时候,需要等待一个算子执行完成的event被触发,这样算子之间的数据同步就不需要CPU的干预了。

1
2
3
4
5
6
7
8
9
10
11
12
13
14
15
16
17
18
19
20
21
22
23
24
25
26
27
28
29
30
31
32
33
34
35
36
37
38
39
40
41
42
43
44
45
46
47
48
49
event_impl::ptr gpu_queue::enqueue_kernel(cl::Kernel const& kern,
cl::NDRange const& global,
cl::NDRange const& local,
std::vector<event_impl::ptr> const& deps) {
std::vector<cl::Event> dep_events;
auto dep_events_ptr = &dep_events;
if (!context()->get_configuration().host_out_of_order) {
for (auto& dep : deps)
if (auto ocl_ev = dynamic_cast<base_event*>(dep.get()))
dep_events.push_back(ocl_ev->get());
} else {
dep_events_ptr = nullptr;
sync_events(deps);
}
cl::Event ret_ev;
try {
if (!context()->get_configuration().host_out_of_order || _output_event ||
context()->get_configuration().enable_profiling) {
_command_queue.enqueueNDRangeKernel(kern, cl::NullRange, global, local, dep_events_ptr, &ret_ev);
} else {
_command_queue.enqueueNDRangeKernel(kern, cl::NullRange, global, local, dep_events_ptr, nullptr);
}
} catch (cl::Error const& err) {
throw ocl_error(err);
}
return _events_pool->get_from_base_pool(context(), ret_ev, ++_queue_counter);
}
void gpu_queue::sync_events(std::vector<event_impl::ptr> const& deps) {
bool needs_barrier = false;
......
if (needs_barrier) {
try {
if (_output_event)
_command_queue.enqueueBarrierWithWaitList(nullptr, &_last_barrier_ev);
else
_command_queue.enqueueBarrierWithWaitList(nullptr, nullptr);
} catch (cl::Error const& err) {
throw ocl_error(err);
}
_last_barrier = ++_queue_counter;
}
}